GRAIN Tab
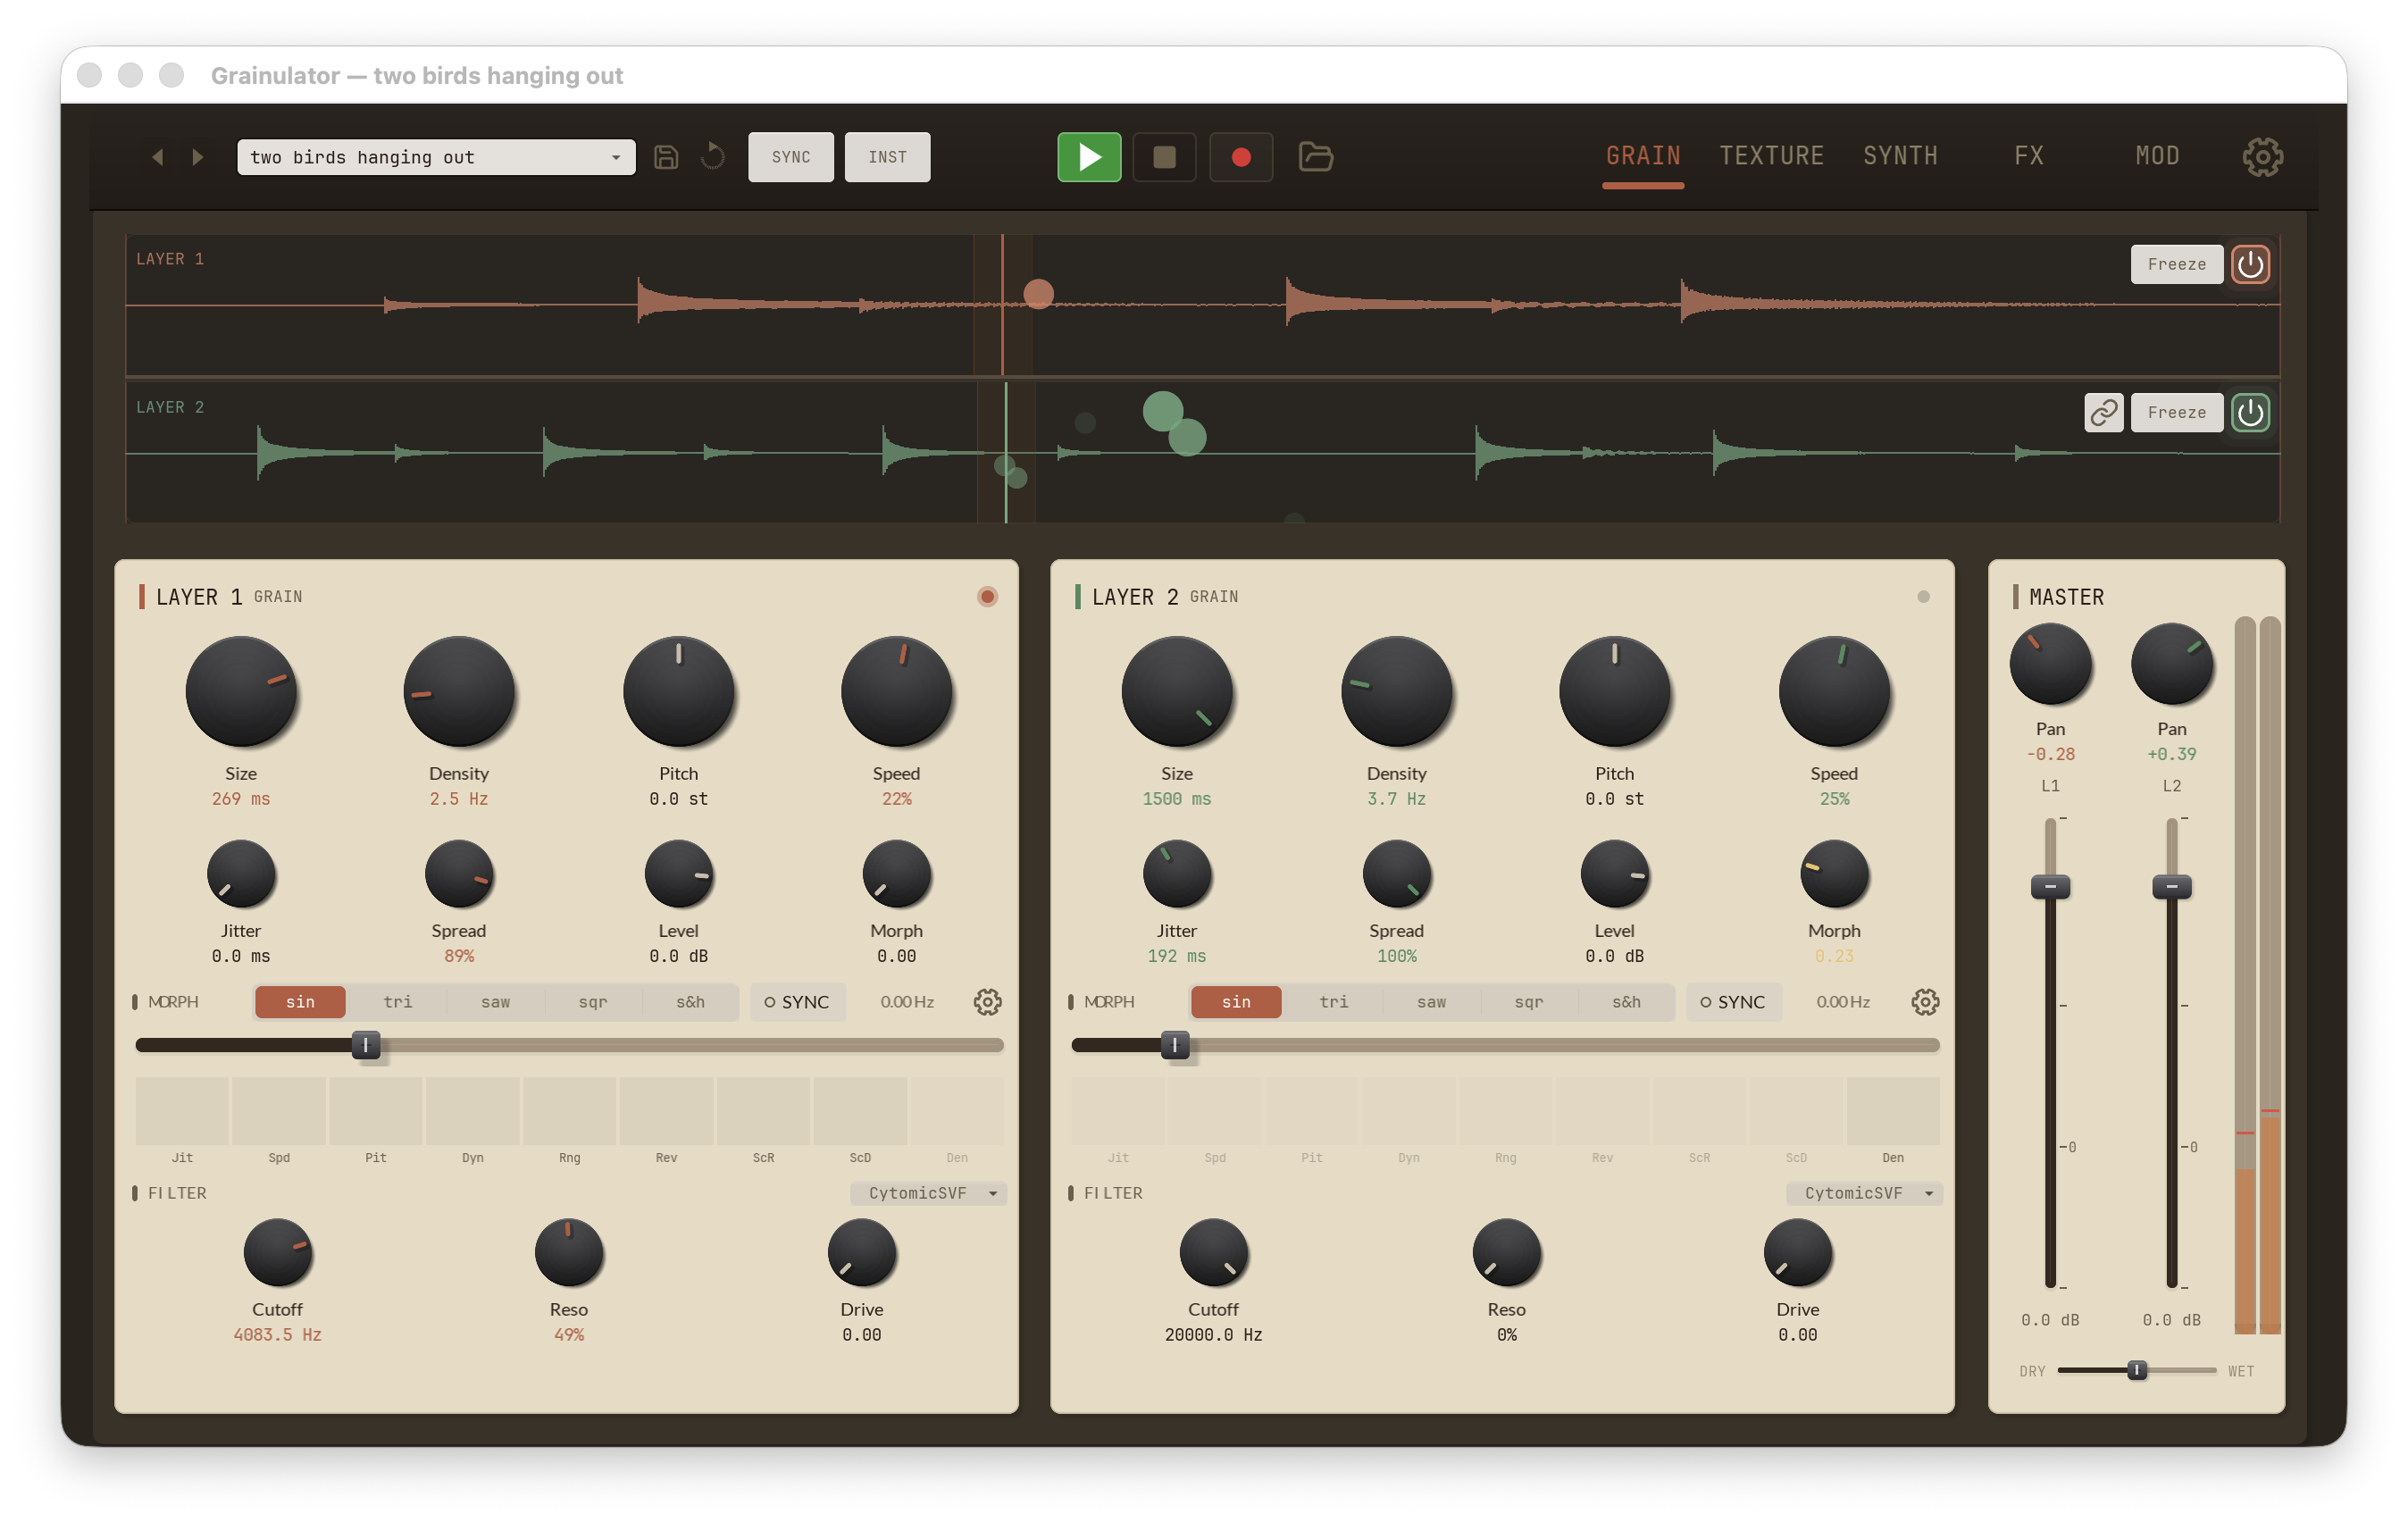
The GRAIN tab is Grainsmith's default view and the heart of the granular engine. The desktop layout shows both layers side by side, all the time — there is no layer-focus toggle. From left to right the tab is:
- LAYER 1 panel — Layer 1's grain core, per-layer Morph, and per-layer filter, stacked top-to-bottom.
- LAYER 2 panel — the same controls for Layer 2, independently set.
- MASTER panel — pans, faders, the global VU meter, and the Dry/Wet blend.
A pair of waveform displays sits above the panel row, one per layer. See Waveform Display for everything they do.
Per-layer panels
Layers 1 and 2 carry the same controls; setting them independently is how you build dual-source patches, call-and-response textures, and layered pads. Each panel has three sub-sections — GRAIN, MORPH, and FILTER — stacked from top to bottom.
GRAIN sub-section
Eight knobs in two rows of four drive the granular engine.
| Control | Range | Description |
|---|---|---|
Size |
0.001–1.5 s | Duration of each grain. Short sizes give choppy, rhythmic textures; longer sizes produce smooth, pad-like tones. Latched at grain spawn. |
Density |
1–512 Hz | Grain spawn rate. Higher values create denser, overlapping clouds; lower values leave sparse, audible gaps. |
Pitch |
−24 to +24 st | Transposes the layer in semitones, applied at grain spawn. The caret (▾) on the knob's readout opens the pitch-mode popup — see Pitch modes below. |
Speed |
−3 to +3 (displayed as %) | Internal playback speed multiplier. Negative values play in reverse; values outside ±1 combine with Pitch for extreme time-stretch effects. Displayed as a percentage (100 % = 1.0). Latched at grain spawn. |
Jitter |
0–0.5 s | Random offset added to each grain's start position. Small amounts humanize the stream; larger amounts scatter grains across the buffer. |
Spread |
0–1 | Stereo spread of grain pan. 0 is mono, 1 is full L/R separation. |
Level |
−70 to +12 dB | Per-layer grain level. Mirrors the layer fader in the MASTER panel — moving one moves the other. |
Morph |
0–1 | Per-layer macro that simultaneously moves every assigned morph target. 0 leaves parameters at their base values; 1 drives them to their configured target values. Targets and depths are configured from the gear button in the MORPH strip. |
Size and Density
interact: their product is roughly the overlap. At 100 Hz with 50 ms
grains you have ~5 grains at once — a continuous drone. Drop density to
5 Hz and you hear each grain individually. Jitter
then breaks up machine-gun periodicity.
Pitch modes
The Pitch knob can snap to a set of allowed
pitches instead of moving continuously. Click the small caret (▾) on the
knob's value readout to open the pitch-mode popup. The popup has two
dropdowns:
| Setting | Options | Default |
|---|---|---|
| Mode | Octaves / Oct+5ths / Scale / Free / Chromatic | Chromatic |
| Scale | Major, Minor, Pent Maj, Pent Min, Dorian, Mixolydian, Harm Minor, Phrygian, Lydian, Locrian, Whole Tone, Chromatic | Major |
Each mode limits where the knob can land across its full −24 to +24 semitone range:
- Octaves — whole octaves only (0, ±12, ±24).
- Oct+5ths — octaves plus perfect fifths.
- Scale — the nearest degree of the selected scale.
- Free — no snapping; any fractional value.
- Chromatic — the nearest whole semitone. This is the default and matches how the knob behaved before pitch modes existed.
The knob snaps on release: drag freely and it lands on the nearest
allowed pitch when you let go. In Free mode the readout shows one
decimal (for example +7.4 st); every other mode reads in whole
semitones. Changing the mode or scale re-snaps the held pitch right away,
so you don't have to nudge the knob to hear the change.
The Scale setting is shared with the per-grain pitch variation on the TEXTURE tab — pick a scale in the Pitch popup and the TEXTURE scale dropdown follows, and vice versa. The pitch-mode setting itself is per layer, so Layer 1 and Layer 2 can snap to different pitch sets.
MORPH strip
Below the eight grain knobs sits the per-layer Morph LFO strip — an
LFO that automates the Morph knob above. The
two together are how a single layer evolves over time without any MOD
lane assignment.
| Control | Range | Description |
|---|---|---|
ON |
toggle | Enables the Morph LFO for this layer. Off = the Morph knob is static. |
Wave |
Sine / Triangle / Saw / Square / S&H | LFO shape, picked from the inline wave-selector buttons. |
SYNC |
toggle | When on, the rate snaps to the host tempo at the configured division. When off, Rate is in Hz. |
Rate |
0–0.5 Hz (free) / division (synced) | LFO speed. The free range tops out at 0.5 Hz — this is a slow evolution control, not an audio-rate LFO. With SYNC on, the rate follows a host-tempo division instead. |
A horizontal bar beneath the controls visualises the live LFO output across each assigned target.
The gear button at the top right of the MORPH strip opens the morph
settings popup, where you assign which parameters the
Morph knob drives and at what depth.
FILTER sub-section
The FILTER row is the per-layer filter, upstream of the global master filter on the FX tab. Only the tone-shaping controls live here; the filter envelope (ADSR and Env Depth) is on the SYNTH tab.
| Control | Range | Description |
|---|---|---|
Filter Model |
10 models | Dropdown selector: Stilson, Microtracker, Krajeski, MusicDSP, Oberheim, Improved, RKSimulation, Hyperion, DaisyLadder, CytomicSVF. Each model has a distinct saturation and resonance character. Defaults to CytomicSVF. |
Cutoff |
20 Hz – 20 kHz | Filter cutoff frequency. |
Reso |
0–1 | Resonance amount at the cutoff. High settings self-oscillate on some models. |
Drive |
0–1 | Input drive into the filter stage. Adds saturation and harmonic content, especially at higher resonance. |
Layer header
Each layer panel's header shows LAYER 1 GRAIN / LAYER 2 GRAIN and a small activity indicator. The indicator lights when any grain is sounding on that layer — a quick way to verify a layer is producing audio without watching the meters.
MASTER panel
The Master panel sits to the right of the two layer panels. It moved here from the FX tab in the 2026-04-07 layout revision so layer balance and wet/dry are always visible on the default view.
| Control | Range | Description |
|---|---|---|
Layer 1 Pan |
−1 to +1 | Stereo pan for Layer 1. |
Layer 2 Pan |
−1 to +1 | Stereo pan for Layer 2. |
Layer 1 Level |
−70 to +12 dB | Layer 1 vertical fader. Mirrors the Level knob in Layer 1's GRAIN row. |
Layer 2 Level |
−70 to +12 dB | Layer 2 vertical fader. Mirrors the Level knob in Layer 2's GRAIN row. |
| Master VU meter | — | Stereo meter on the master output (post layers, post wet/dry). |
Wet/Dry |
0–1 | Global wet/dry balance between the granular output and the dry input. |
The faders carry small tick marks at common reference levels (−∞, −12, −6, 0, +6) so you can balance two layers by feel.
Dual waveform display
Above the panel row, the GRAIN tab draws two waveform displays side by side, one per layer, each with its own position cursor, active-grain dots, freeze button, and trim handles. Layer 2's display also carries the layer-link toggle for switching between shared and independent buffers. See Waveform Display for the full treatment.
See also
- Waveform Display
- Layer System
- TEXTURE Tab
- SYNTH Tab — Spectral, Voice Interaction, sub, envelopes & MIDI
- FX Tab